Running WEB Reports
If you are having issues running WEB reports using IE, please try Chrome or Firefox.
- The data warehouse is Fund/Org secure. If you do not have access to the fund you will not be able to view the results
- You will only be able to run these reports once you have FIS access and Data Warehouse Access.
- When running reports off of the Operating Ledger the dates must be according to the University fiscal Year. Running reports off of the Grant Ledger requires the Calendar Year dates. (more information)
For questions or help in using any of these resources, contact the FIS Service Desk Portal: 514-398-3463
(Click on the titles to expand any of the topics listed below.)
Login Instructions for Web Report Templates
Access to web reports requires VPN (Virtual Private Network) connection
- Select the report you wish to run by clicking the "Web Report" link.
- The BusinessObjects logon window will appear. (If running multiple reports in one sitting, you will be prompted to enter information on this screen only once.)
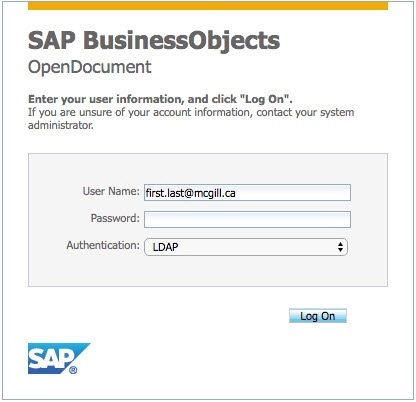
Enter your McGill Username (first.last [at] mcgill.ca) if it is not already displayed, and enter your McGill Password. (more information) - Below the McGill Password field, ensure that Authentication is set to LDAP.
- Click Log On.
[If you have data warehouse access, and are unable to proceed past this step, contact the Finance Help Desk at 514-398-3463.] - A Database Logon screen for banrep will appear.
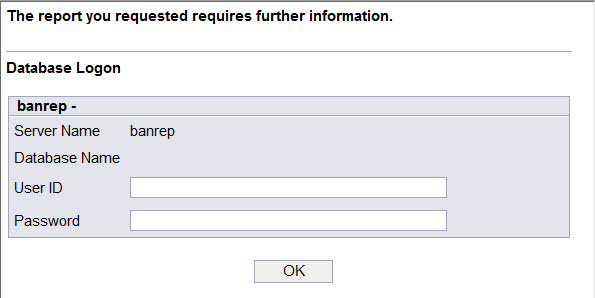
Enter your Banner UserID (User ID field) and enter your Banner password. (more information) - Click OK.
- At the prompt, enter your report parameters. Remember to complete all fields.
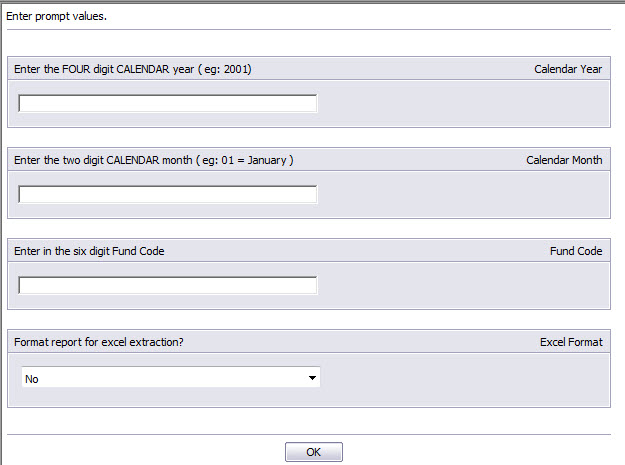
- Click OK.
- The report displays your data dependent on the criteria entered in the prompts
TIPS:
- Use the icons in the Crystal Reports web browser to print, save, and export the report.

- Consult the IT Knowledge Base for troubleshooting tips (supported browsers, printing issues, etc.).
Exporting data from Web Reports
- Run the report using the preferred options
- On the upper left corner, press the diskette/paper button called “Export this report”
- Export
- File Format:
- Crystal Reports (RPT) – To save a copy of the template
- Microsoft Excel (97-2003) Data-Only – Preferred excel version
- Page Range: All Pages
- File Format:
- Click Export
- File Download: Click Save
- Select Location where to save and option, change file name
- Click Save
Note: These steps were performed using Internet Explorer and for other browsers, steps 5 to 7 may be different. | This method has no options as the desktop version. Formatting cannot be preserved in the export to excel.
Login Instructions for Crystal Report Templates
- Select the report you wish to run by clicking the "Crystal Report" link.
- The report template will open up in the Crystal Reports environment.

- Click the Refresh button (F5) to run the report.
- At the prompt, enter your report parameters. Remember to complete all fields.

- Click OK.
- An Oracle Server window will appear.
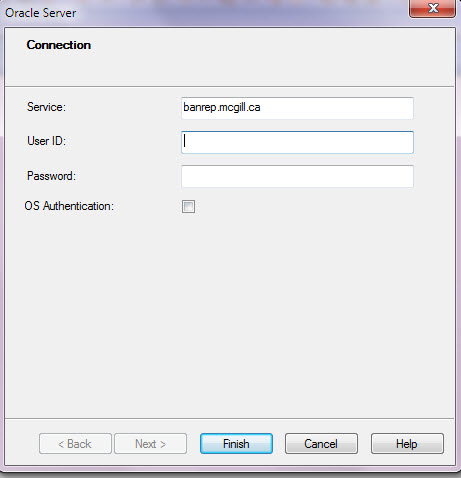
Ensure the Service field displays banrep.mcgill.ca. - Enter your Banner UserID (User ID field) and enter your Banner password. (more information)
- Click Finish.
- The report displays your data dependent on the data entered in the parameters.
TIPS:
- Click the Print icon to print the report.
- To refresh the report or run the report with new values, click the Refresh button (F5).
- To toggle between pages, click the arrows located at the top right of the page.
- To save the report click the Save button.
- In the Crystal Reports environment you may edit or manipulate the report.
Exporting data from Crystal Reports
- Run the report using the Excel friendly option
- On the menu bar, select File > Export > Export Report
- Format: Microsoft Excel (97-2003) Data-only
- Destination: Application
- Click Ok
- Excel Format: Custom
- Click on “Options >>>” if Options selection not available
- Optional: Check Export Object Formatting – to keep the colour formatting from Crystal Reports
- Uncheck Export Images
- Uncheck Use Worksheet Functions for Summaries
- Uncheck Maintain Relative Object Position
- Uncheck Maintain Column Alignment
- Uncheck Export Page Headers and Page Footer
- Uncheck Simplify Page Headers – to export column headers
- Uncheck Show Group Outline
- Click Ok
HOW TO modify Crystal Reports Templates
CRYSTAL REPORTS - ![]() Design and Preview tabs and Hide and Suppress options
Design and Preview tabs and Hide and Suppress options
CRYSTAL REPORTS - ![]() FIS Data Warehouse Views
FIS Data Warehouse Views
CRYSTAL REPORTS - ![]() Sorting records (Record Sort Expert)
Sorting records (Record Sort Expert)
CRYSTAL REPORTS - ![]() Grouping Data
Grouping Data
CRYSTAL REPORTS - ![]() Modifying the formatting of text objects and fields
Modifying the formatting of text objects and fields
CRYSTAL REPORTS - ![]() Inserting, deleting, and moving text objects and fields
Inserting, deleting, and moving text objects and fields
CRYSTAL REPORTS - ![]() Data Selection: Adding prompting query fields and related record selection criteria to a report (Parameter Fields, Select Expert Record)
Data Selection: Adding prompting query fields and related record selection criteria to a report (Parameter Fields, Select Expert Record)
CRYSTAL REPORTS - ![]() Selecting specific records to display once a report has been run (Select Expert Record)
Selecting specific records to display once a report has been run (Select Expert Record)
Frequently Asked Questions on How to Modify existing Crystal Reports Templates
Note – All of the actions listed below may be performed in both the Design and the Preview tabs. The instructions below state the recommended tab to use.
| I want to | Steps |
|---|---|
|
Sort displayed transactions by a field appearing in the report (for example: sort transactions by Activity code) |
Note: Depending upon how many groupings are in a report, the sort order may be superseded by the groupings. To change it to be the first sort in your report:
|
|
Display transactions matching a specific value for a field appearing in the report . For example: Transactions posted to Account code 700026 or Transactions with an Actuals value greater than $5,000. |
|
| Group displayed transactions by a field appearing in the report (for example: group transactions by Activity code, group funds by FFM). |
To insert associated information into the group header (for example: display the activity title next to the Activity code or display last name and first name next to the FFM ID):
|
| Switch the grouping order of the displayed transactions. |
To switch the Grouping order, go to the Design Tab.
|
| Change the Background color of the Group Header. |
|
| Delete a grouping. |
|
| Hide transaction details and only display the group header/footer. |
|
| Display transaction details which are hidden. |
|
| Add a fund to a report that queries only one fund. |
|
| Reduce the height of a section (header, footer, details) - there is a lot of white space remaining, but, something is blocking the section from being reduced. |
|